Spring+MongoDBでWebアプリケーション入門(2/3)

前回からの続きでSpring+MongoDBでアンケートWebアプリを作成する。今回はMongoDBを導入し、アプリケーションを実行できるところまで実装する。
MongoDBの準備
MongoDBを用意する必要があるので、公式サイトからtgzをダウンロードして好きな場所に解凍しておく。解凍したディレクトリに移動して以下のコマンドで実行できるはずである。
$ ./mongod --nojournal --noprealloc --dbpath <データを格納するフォルダ>
sponsor
設定ファイル
MongoDBをWebアプリから使用できるよう、設定ファイルを修正する。まずはじめにMondoDB用のContextファイルを新規作成する。
mongodb-context.xml
<mongo:mongo host="127.0.0.1" port="27017" />
<mongo:db-factory dbname="survey" />

<bean id="mongoTemplate" class="org.springframework.data.mongodb.core.MongoTemplate">
    <constructor-arg name="mongoDbFactory" ref="mongoDbFactory" />
</bean>
ほぼ公式サイトそのままの設定で使用できる。必要ならhost、port、dbnameを変更する。配置場所は他のContextファイルと同じくwebapp/WEB-INF/spring配下に配置する。
web.xml
<context-param>
    <param-name>contextConfigLocation</param-name>
    <param-value>
        /WEB-INF/spring/applicationContext.xml
        /WEB-INF/spring/mongodb-context.xml
    </param-value>
</context-param>
先ほど作成したmongodb-context.xmlを読み込む設定をweb.xmlに追加する。
pom.xml
<dependency>
    <groupId>org.springframework.data</groupId>
    <artifactId>spring-data-mongodb</artifactId>
    <version>1.2.0.RELEASE</version>
</dependency>
<dependency>
    <groupId>cglib</groupId>
    <artifactId>cglib</artifactId>
    <version>2.2.2</version>
</dependency>
ライブラリはspring-dataを使用するのでpom.xmlに記述を追加する。
RepositoryImplの実装
設定ファイルを作成したので、これでアプリからMongoDBを操作できるようになった。Repositoryインターフェースを継承したMongoDB用のRepositoryImplを作成し、DB操作ロジックを記述していく。
SurveyAnswerRepoMongoDBImpl
public class SurveyAnswerRepoMongoDBImpl implements SurveyAnswerRepository {

    @Autowired
    private MongoOperations mongoOperations;

    public List<SurveyAnswerEntity> selectByUserid(String userid) {
        Query q = new Query(Criteria.where("userid").is(userid));
        return mongoOperations.find(q, SurveyAnswerEntity.class);
    }

    public boolean insertEntity(SurveyAnswerEntity entity) {
        mongoOperations.save(entity);
        return true;
    }
}
MongoDBはMongoOperationsでアクセスできる。mongodb-context.xmlに記述したmongoTemplateのbean設定があればこれも@AutowiredでDIできる。
selectByUseridはuseridでselectするというメソッドだったので、対応するQueryを作成しmongoOperationsで実行するだけでよい。insertEntityも実装は簡単である。
Entityの修正
EntityクラスをそのままMongoDBに永続化するため、Hibernateのようにアノテーションを使用したデータ構造の宣言が必要がある。しかしMongoDBはスキーマレスであるから、HibernateほどO/Rマッピングをしっかり書く必要はない。
@Document(collection="surveyanswer")
public class SurveyAnswerEntity {

    @Id
    private String userid;
    private String date;
    private String survey1answer;
    private String survey2answer;
}
@Document(collection="surveyanswer")でEntityを格納するコレクション(RDBでいうテーブル)の名前を指定し、useridが主キーであることを@Idで宣言しているだけだ。
実行
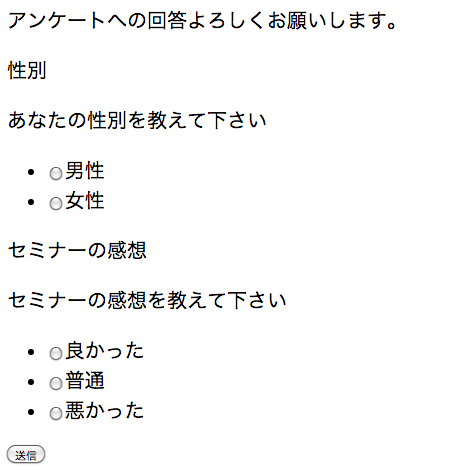
ここまで作成すればアプリが実行できるようになっている。MongoDBを起動したままでアプリをTomcatに配置し、http://localhost:8080/SurveyApp/answer/<好きな文字列>でアクセスすれば、以下のようなアンケート回答ページが表示されることが確認できる。
しかしまだアンケート回答結果を見る機能がないので、DBに本当に格納されているのか確認できない。
次回は管理者向けのアンケート結果を確認できる画面を作成する。
というかここまで簡単にMongoDBが使えるとは思っていなかった・・・Spring Dataバンザイ!
sponsor
